IVER

IVER
All this stuff is copyright protected, so please don't steal my photos, it's just wrong. In fact, click on the photo above and read an article on why it's wrong.

Wednesday, November 16, 2011

The Salon

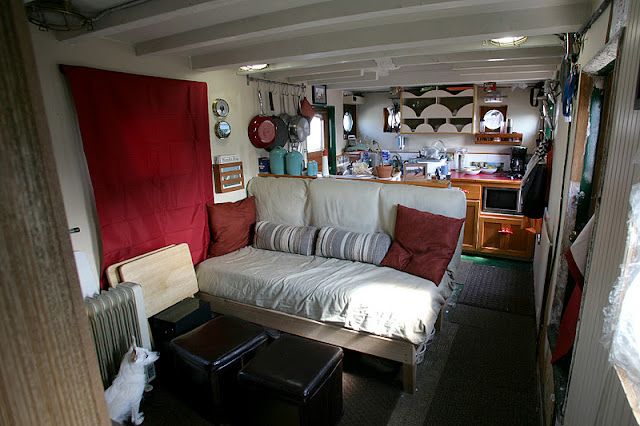
Basically the cabin is one large (well not so large, but big enough) room.  It's 8 ft wide and about 16 ft long, with the galley aft.  When we first bought the tug we thought we would be adding on to the cabin but after living aboard for over a year we found that we just don't need extra room and we like the original lines of the tug.

We built a settee (boat for couch) by re purposing a desk Bill had built for me out of a pallet. It was a very nice pallet, solid oak.  The desk top was a chunk of lab table top (you know the stuff from chemistry class)  that was salvaged from a construction site.  We used that in the stateroom on top of the dresser.  We made the settee with space underneath for the dogs (they're small) that's where we put their water and food dishes.  For the cushion we cut down a foam mattress we had lying around, this way the settee can also be used as a guest bunk.  Eventually we'll have the cushions professionally upholstered, but for now the futon cover works fine.


  The wall opposite the settee is the stack, all the exhaust piping from the engine room (engine and genset) go up through the stack.  On that wall we built in our entertainment center.  We had a large flat screen tv before we bought the boat, so we just built it to fit. 

To the right of the built-in is a door, this covers a space next to the stack that is now useable as a locker.  There's a door to the outside, so it can be a wet or dry locker, creating storage from what had been an unusable space.  The wood we used is mahogany, it was salvaged from a house on Lake Washington.    The cabinets provide much needed storage for laptops.
For the floor we laid down a bunch of carpet tiles we picked up at the re-use store.  Future plans call for a nice T&G solid wood floor to cover the plywood.

Update on the Salon:  Well we gave up on the custom settee, we had the cushions professionally done and they did not come out as expected.  It ended up being as comfortable as a church pew and not the nice padded kind with a slant to the back, but the straight up, rock hard kind.  So it was off to Ikea for a nice leather loveseat that fits perfectly but is a little deeper than we would have liked.  It looks good, it's comfy and the dog hair just brushes off.  Bill made the table, it's a hi-lo table. We can adjust the height from coffee table to dining table.   Put up the flap on the end and there's room for 4 to dine. 

Monday, November 14, 2011

The Stateroom

Now that we had a working galley and head, we started on the stateroom.  It's a pretty big space, so we were able to build in a queen size bed as well as plenty of storage for clothes.


We found a really good deal on a bunch of cherry wood, so the hanging locker, dresser drawers and shelving unit with doors are all made from cherry. We also added a nice piece of cherry wood on the beams along the walls to make shelves and painted the walls a warmer color.


The black plastic on the ceiling is there to keep debris from falling on us while we replace the decking on the bow.

The head

Believe it or not, the head has a large jetted jacuzi tub.  It was installed before the walls were put up so getting that sucker out was not an option.
There was no back wall at the edge of the tub, so if you took a shower the water could splash onto the only electric outlet in the room.  The sink and vanity was too big, in fact half the door trim was removed to make it fit.  And to make it totally unusable as a head, the toilet was plumbed directly out the side of the boat.  yuck! So what to do about the toilet?  We would have to add a black water tank in the engine room and then run a pipe out to the deck to pump out the tank.   Sounded pretty simple until we measured the opening of the hatch to the engine room.  We couldn't get a very big tank down there, so we would have to pump out quite often, maybe once or even twice a week.  There is no pump out at our boatyard, so we would have to pay someone to come on a boat and pump us out.  That would be about $600 a year or more.  So I started doing research on alternatives.  We could put in a waste water treatment system, they can be quite expensive and still might not be in compliance with the no discharge laws in the area.  Then I looked into dry composting toilets, at the time there were two companies that manufacture composting toilets specifically for boats, both are kind of expensive, around $1,000.00.  Household composting toilets were just as expensive, so I looked into DIY options.  I found a kit online for just $112.00, a few pieces of scrap plywood and a couple of containers and we had our new dry composting marine head.  Not all the crew was on board, it took me 2 months to convince Bill that this was the best solution for our problem.  He is now a complete convert and we are planning on doing the same thing in our sailboat. (we did replace the marine head in our sailboat, but we used a C-Head and we'll probably replace our DIY unit with a C-Head also) The toilet is easy to maintain, there is no head smell and the cost was a fraction of what all the other alternatives would have been.

Here's what the new dry composting toilet looks like.....
This is a regular seat and lid. 
 The solid waste goes into the aluminum pot, we've added a metal rod to mix the peat moss.  The liquid goes into a plastic kitty litter container.

 This is the kit that separates the liquids from solids, and makes this a dry composting toilet.

I put a rubber gasket on the lid to seal the unit and painted the outside of the blue separating kit piece white to match the seat.  We later added a small computer fan on the side that vents into the stack.  Just a small amount of air moving will help with the drying process. 

We empty the liquid container every couple of days and the solids container every 4 to 6 weeks.  We have used peat moss, cocoanut coir bricks and recently sawdust from our planer as a medium in the solids bin.  All work just fine. 

We wanted to remove and replace the tub, but it's ginormous and would have been a real PITA to get it out.  We thought about cutting it apart with the sawzall but decided to just live with it for the time being.  We replaced the shower head (which came up to my clavicle) with a hand shower head, so that brought the shower head up high enough we didn't have to crouch to wash our hair.  We then added a new wall at the end of the tub which also added more storage.  You may be wondering why we were not thrilled with having a jacuzzi jet tub in our boat, well we did fill it up and turn it on one day, it sounded like a briggs and stratton lawn mower engine and it took almost 30 minutes to fill up, very relaxing. :)  But as a shower it turned out to be okay.   We also replaced the large vanity with a half sized one, moved the medicine cabinet from the opposite wall and I used old charts to cover the wall damage from the large mirror the PO had adhered to the wall with liquid nails. 
Here's a view of the other end of the head.  My mother came over for a few days and we painted the cheap plywood wainscot, added some trim to give a more finished look and took out the end of the wall to open up the area behind the tub.

Getting Started

Once we bought the boat the first thing to address was the deck, like most old wooden boats, she leaks from above.  So we quickly put a layer of plywood and a couple of layers of Gaco deck sealer on the outside decks.  We only had a couple of weeks until the Seattle rainy season started so we had to work fast.
After sealing the decks as best we could, we started on the interior.  Our goal was to live aboard as soon as possible.  The interior of the tug was not original, the previous owner had built in a kitchen area and had converted the captains cabin into a head.  The fo'c'sle (bow area) was the sleeping area or stateroom.
Galley
Head

fo'c'sle (stateroom)

We tackled the galley first, the counter tops were too high, there were no drawers and the stove/oven was a tiny electric thing that was just not going to cut it for every day cooking.  So it all had to come out. 
Bill built brand new cabinets with drawers.  We relocated the sink from the exact middle to off to one side to get more counter space and put the microwave under the counter.
We replaced the tiny electric boat stove with a full size gas oven (converted to propane) and lowered the counter top to a standard height.  Red formica went on top of the counters and what would have been dead space between the stove and fridge, we turned into a pantry can drawer.

We bought some white subway tiles at the re-store and to add a little color to the back splash, I decoupaged photos to a few of the tiles.  I painted some small boat cleats red and used them for our cabinet hardware.  We built a boat style dish cupboard that holds all our dishes, salad spinner, colander, mixing bowls, etc.  We now have plenty of storage in the galley.

I wanted something on the floor , so I painted a long narrow floor cloth.

Next up, the head.......